Import clients from a spreadsheet
Who can do this
Anyone with CRM Access.
Importing has three steps — Upload, Preview and Import — and you can check everything before any client is created.
1. Fill in the template
- Open Clients and click the arrow next to New Client, then Bulk Import.
- Click Download Template (.xlsx) and open the file in Excel, Google Sheets or Numbers.
- Fill in one client per row, starting on row 9. Keep the headings on row 8 exactly as they are, and don't reorder or delete columns.
- Save the file as CSV. The import accepts
.csvand.txtfiles up to 25 MB.
| Column | What to enter |
|---|---|
| COMPANY/CLIENT NAME | Required. |
| STATUS | Required. A status name or ID, such as Quoted. |
| MANAGER | Required. The person's first name, surname, full name or user ID. |
| ORIGIN | Optional. Left blank, the client's origin is Import. |
| NOTES, ADDRESS 1–5, BILLING ADDRESS 1–5 | Optional. |
| CONTACT NAME / SURNAME / EMAIL / CELL / TEL | Up to two contacts. To add more, add columns after CONTACT TEL 2 named CONTACT NAME 3, and so on. |
| Your custom fields | One column per field. For dropdowns, use the option's name. |
Not sure what to type for a status or manager?
Click Options Reference in the import window to see every valid status, origin and manager, or Download as .txt to keep the list next to your spreadsheet.
Some formats matter:
- Phone numbers need a country code, such as
+1 312 555 0123. A row with a phone number BaseCloud can't read is skipped. - Dates use
YYYY/MM/DD. - Multiple choices in one cell are separated with
|, for exampleGold|Referral. - Checkboxes take
yes,y,trueor1.
2. Upload and check
- Drop your file onto the window, or click to browse for it.
- Click Validate & Continue.
BaseCloud checks every row and shows how many are ready (approved) and how many have errors, with a preview of the first few clients.
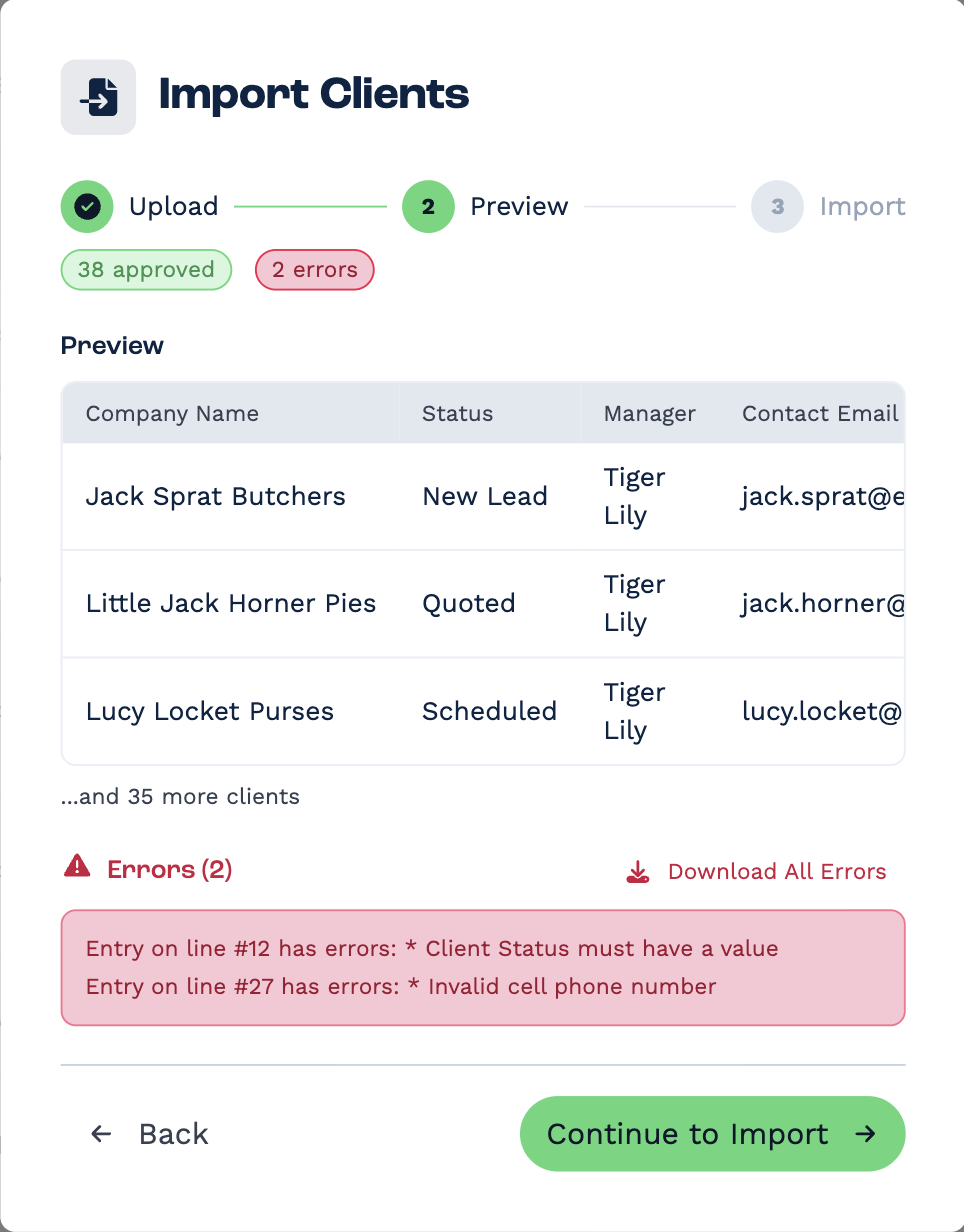
If there are errors, click Download All Errors for the full list. Rows with errors are skipped — fix them in your file and import those rows again later, or go Back and upload a corrected file now.
3. Import
- Click Continue to Import.
- Check the summary — You are about to import N clients — and click Import N Clients.
The window closes and the import runs in the background. Follow its progress under the notifications bell at the top of the page, where it says Successfully imported N clients when it's done.
Duplicates aren't detected
The import doesn't check whether a client already exists, so importing the same row twice creates the client twice. If that happens, merge the duplicates.
Imported contacts don't receive quotes and invoices by default, and are subscribed to bulk messages. You can change both per contact on the Contacts tab.